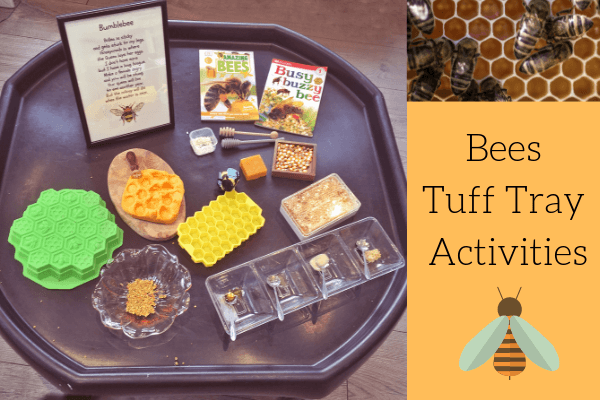
Spring is (almost) in the air, we've seen our first buzzy little friend roaming the emerging flower beds and bees still really need our help to thrive - so what better way to teach the next generation all about the importance of bees than a Bees Tuff Tray Activity!
It started out with the purchase of a pack of 'bee pollen' from a local supermarket - I was intrigued to learn more about it and I wanted Arthur and Charlotte to join in with a real hands on 'learning through play' approach. I sourced a number of resources which you can find over in the 'bees activity' section of my Amazon store here (USA followers click here for my US list) and got to work planning some activities:
Honey Bees tuff spot tray activities - learning through play
As with all Learning Through Play activities, I like the resources and activities to be open ended, planned loosely but subject to change depending on the need after careful modelling by an adult.
Fact books about bees
We started out by reading some fact books about bees together. This Busy Buzzy Bee book and Amazing Bees book are both full of stimulating, real life photos of bees at work - explaining their life cycle and how pollen and honey is used and made. We could see how the bees laid eggs, fed them pollen, covered them and waited for them to emerge as baby bees before feeding them. I introduced the bees tuff tray activity using these books so that the resources could be used in a meaningful way. These are a great size for little hands to use independently too. This life-cycle set with an egg, larvae, pupae and bee can be used alongside the books to order how a bee comes to be!
Bee finger puppet
We used this bee finger puppet to help us walk through the story and act out what happens when a bee is busy working! We then used the bee puppet on the tuff tray to help collect pollen, lay eggs and feed the baby bees - allowing for re-enacting, imaginative play and use of new language.
Honey playdough with a bee stamper
I made some yellow pollen/honey playdough using my recipe which can be found in my 'ice cream role play' post here, or a quick demo video in my Valentine's Day sensory playdough tuff tray here. This was presented alongside this bee stamp and honeycomb and bee mould for open ended play and exploration. Playdough is a wonderful sensory tool for young children and also helps to build up the muscles in their hands and arms ready for learning how to write and hold a pencil later on. Exploring how to make different shapes and patterns allows for a large amount of new language for young children - helping them to describe their movements such as 'rolling', 'squashing' 'pinching' in the early stages of development, to discussing patterns, shapes and their properties in the later stages of EYFS development.
Bee print artwork from KRK prints [AD-Gifted]
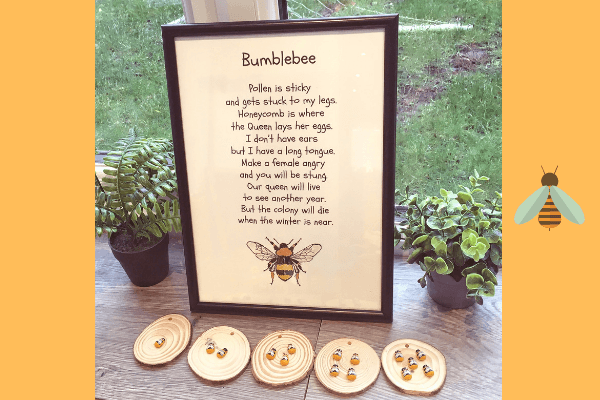
This Bee print and poem from KRK Prints was a previously gifted item which works perfectly for this activity. The poem depicts some important bee facts and highlights the life-cycle of bees, opening up further discussions with young children. This made a wonderful poetic introduction to our activity ( not to mention being able to recognise and pick out rhyming words!), but it is nice enough to stay on display in our playroom as a little reminder of our work. Kelly designs and makes these prints herself and has some other lovely, educational prints all about different animals. You can see her work on etsy or on her instagram page.
Bee pollen investigation
Bee pollen is often used a healthfood nowadays. The children were able to feel and taste the pollen and we really enjoyed looking at all of the different colours. After reading the books mentioned above, we knew that bees collected pollen in little baskets on their legs to take back to the hive to feed to the tiny eggs and bees. I displayed the pollen in the center of a flower shaped bowl so that the children could role play collecting the pollen from the flower and then taking it back to their nest......
Silicone honeycomb with mini eggs, pollen and bees
Here I set up a silicone honeycomb mould, which was supposed to replicate the honey bee nest back at the hive. I had some grains of rice for the bee eggs and some mini wooden bees for the pupae or baby emerging bees. Arthur enjoyed filling some spaces with eggs and feeding them grains of pollen. He covered some of the spaces with playdough - just like a real bee would do in order for the eggs to turn into honey bees. The mini wooden bees were to symbolise the newly hatched babies and were a brilliant counting aid for 1:1 correspondence, talking about one more/one less, hands on addition and of course, fine motor skills with the pincer grip!
Counting and number ordering Bees on wooden slices
I stuck some of the mini wooden bees onto these wooden slices and left this as an independent number ordering and counting activity for Arthur. I will be making a set of 6-10 next as 1-5 wasn't quite challenging enough for him...
Real honey comb and honey tasting
On the tuff tray I set out a tasting activity for the children to use their senses. I had three types of different honey: Manuka honey, set honey and orange blossom honey, plus some Raw honeycomb, flower spoons and a honey dipper.
We talked about the different textures and tastes and noticed that the raw honeycomb leaves a chewy wax in your mouth which is edible, but hard to actually eat!
Investigating beeswax and its uses
Pure beeswax can be used in lots of different ways and can lead to some great add on science experiments. These honeysticks beeswax crayons are great for mark making and showing how beeswax can be used as a mark making tool. We will also be making our own lipbalms soon, using the beeswax from our tuff tray. For the tray itself I left the block of beeswax out for them to investigate independently. I bought a food grade beeswax so that it would be safe for little ones. The beeswax can also be used with the wax bee stamper mentioned above.
Shape tessellation
Honeycomb allows for lots of shape discussion around hexagons and their properties, pattern making and an introduction into tessellation. The wooden beehive puzzle is a lovely natural resource which children can use to explore and build themselves, extending their own learning with patterns and balance. The numbered wooden hexagon shapes can be used in lots of different ways, from number ordering, counting, number matching, building number towers, placing next to the correct number of mini bees ... the list is endless.
For smaller children the montessori coloured wooden beehive shapes with colour matching bees and tweezers make for a lovely independent activity which can be scaffolded and extended through the use of colour vocabulary, shape and balance.
Shape sorting hexagon ice cubes
Originally this was going to be a tessellation activity using large and small hexagon ice cubes, but Charlotte took control of her own learning and enjoyed the challenge of trying to fit the shapes back into the silicone moulds. This allowed me to use the language of 'big and small' with her as we talked about whether certain shapes did or did not fit. Since this activity she has talked about other objects 'not fitting' within the correct context, so this was a successful learning experience...with an added (cold) sensory element!
Yellow 'honey' royal jelly
One of the facts we learnt about bees was that the Queen bee is fed royal jelly - so we thought it would be a fun activity to make our own honey coloured 'royal' jelly to eat as a treat as part of our extended bees roleplay!
You could even use mini pipettes ( the bees mouth/tongue) to suck up the jelly mixture and squirt it into the silicone mould before allowing it to set.
Manuka honey ice lollies and ice cubes
We managed to come down with a few viruses whilst continuing our activities during the week, so in order to ease little sore throats I made some manuka honey and orange ice pops and ice cubes! The ice cubes were put inside a Nuby net feeder so that they were safe to suck on without the risk of choking.
The was a great way of demonstrating the healing properties of honey and showing first hand how important bees really are.
To make these all you have to do is dissolve some manuka honey in a little boiling water, top up with orange juice and then pour into your chosen mould and freeze! We made ice pops and ice cubes.
Making a Bee hotel
Making a bee hotel and planting lots of bee friendly wild flowers in your outside space is a great way of continuing the learning in a real and meaningful way. We have already noticed some bees visiting our lavender outside and Arthur continues to ask if the baby bees are ready yet!
The beekeeper outfit makes a for a fun roleplay accessory when checking on the bee hotel!
Making honeycomb biscuits
We finished off our learning topic by making some tasty honeycomb shaped biscuits using the silicone moulds mentioned above. As Charlotte is dairy free we just used a simple vegan cookie biscuit recipe and added the flavours we wanted. You could incorporate the bee pollen and/or honey into your mixture too.
Would you like to see how we carried on this play on a smaller scale later on?
I can't wait for our wild flowers to bloom and for the honey bees to start visiting our garden so that we can see them hard at work! Are there any other ways that you would use these resources?
You can see more Tuff Tray ideas in my post 19 Tuff Spot Tray Activities for open ended play or this Frog Pond Tuff tray showing the lifecycle of a frog.
Don't forget to subscribe to my blog feed below to stay up to date with new posts and ideas.
Sarah x


