This summer we saw Charlotte turn one, and as is the tradition in my family - I make the cakes myself. I don't come at this from a professional angle (ha!) I am very much an amateur and this 'how to' guide is really aimed at other parents who just want to give it a go themselves but need a little visual guidance!
Arthur's 1st birthday was a star themed birthday cake based on his first word and obsession! His 2nd was a Fireman Sam cake (made whilst suffering badly from morning sickness!) and earlier on this year I made him a Bin Lorry Birthday Cake for his 3rd birthday. For Charlotte, I didn't really have a set idea in mind except that I wanted a quilted cake, so I set up a Pinterest birthday cake ideas board and decided to just get started and let it evolve as I went along!
To make this cake yourself you will need:
Please note, some of these links are affiliate links - it wont cost you any more to buy them but I may make a small commission from any sales
- Sponge cake mixture - we used Betty Crocker as it is dairy and soya free
- Buttercream
- Jam
- Fondant Icing - we used white
- Icing sugar
- Silver crisp balls, or edible pearls
- Silicone cake border mould
- Lustre spray
- Gold shimmer powder
- Pink shimmer powder
- pink sugar crystals
- Bronze sugar crystals
- Pink food colouring
- Pink food art pen
Stage 1 - making the cake:
I used quite a deep cake tin as I wanted a tall, single cake. I only have the one tin so I actually did this in 2 stages, making one vanilla sponge and one lemon sponge.
To give a nice flat top with clean edges, I used the bottom of the cake on the top and sliced the 'bump' off the top of the cake and used the top for the middle. I sandwiched the two cakes together using a thin layer of jam and a thin layer of buttercream (not too much otherwise is would squash out and also slip).
I had lots of buttercream left over so I used this to cover the entire cake as the 'glue' with which to stick to fondant icing.
Stage 2 - Icing the cake:
This is the bit I find the most tricky, I haven't quite mastered a perfect fondant covering! I rolled the icing onto baking paper (using icing sugar to stop it from sticking), before using the paper to lift and transfer the rolled icing onto the cake. Once it was in place I smoothed it down and trimmed off the excess.
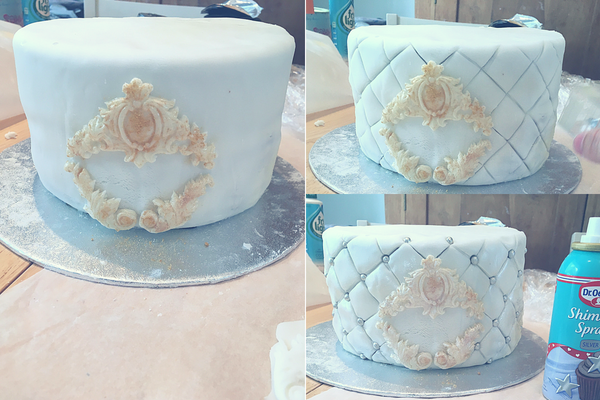
Next, I used the silicone mould (link above) to make the floral border for the front of the cake. This was REALLY fiddly and the mould is so intricate i did have to use a small knife to cut away some of the icing around the edges.
I stuck this edging to the fro of the cake using a little water and a paintbrush, before painting it with a gold shimmer.
Stage 3 - Quilting the cake:
I actually used the square end of a cocktail stick box to press the diamond/square shapes into the sides of the fondant icing on the cake - but you could easily just used a knife to make diagonal lines around the cake in both directions.
To give the quilting a really luxurious feel, I finished off each corner of the diamond with an edible silver pearl. I then sprayed the whole cake with a shimmer spray , or you could use a lustre spray which I have linked to above. This gave the cake a lovely sheen.
I loved how the cake looked at this stage, but it did feel a little too much like a wedding cake, so the next stage was to add in some colour to make it appropriate for a first birthday...
Stage 4 - Final birthday cake decorations:
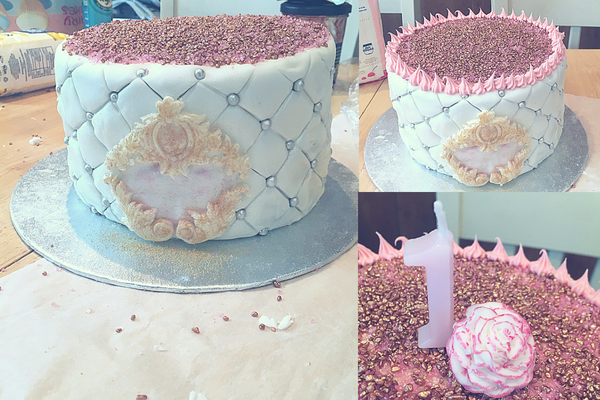
As you can see in the photos, I used the pink shimmer to paint the background within the gold frame.
I added a thin layer of buttercream to the top of the cake and then sprinkled on a mixture of pink and bronze sugar crystals (I mixed them together before sprinkling).
I added some pink food colouring to the remaining buttercream and then piped this around the edge of the crystals on top of the cake, before adding a thin pink line around the bottom of the cake to finish it off.
A number 1 candle was added to the top and I made a little flower for the top using the remainder of the fondant icing - which I edged in pink using the pink food colouring pen.
Stage 5 - Adding the name to the birthday cake:
This was actually the trickiest bit as I couldn't make any mistakes!! I used the pink food colouring pen to add a number 1 to the center of the frame before writing in Charlotte's name!
What do you think?
Step by Step visual of making the quilted birthday cake:
Is there anything you would do differently?
I'd love to hear your thoughts...
Sarah x
PIN ME:
Would you like to subscribe to my feed? (please check spam folder for confirmation link within email):
Other posts you might like to read:


